


Hw: Cast a Bibenda – Simple Pneumatic Bending Actuator
Image Credit: Image the Western Australian Herbarium, Department of Biodiversity, Conservation and Attractions (https://florabase.dpaw.wa.gov.au/help/copyright).
“Newly-classified in 2007, Tecticornia Bibenda is a unique succulent native to Western Australia, and has been recognized as a plant particularly worthy of conservation and continued research. Its segmented stem frequently prompts comparison to the Michelin Man. The Bibenda Actuator’s relationship to this plant extends beyond the nod to the segmented bulbous shape, finding bio-inspiration from the mobility of plants, which move via hydraulic manipulation while most animals use muscle contraction. Usually plant hydraulic motion occurs as tissue-level adjustments of fluid (primarily water): for example, with the inside of a curve having less fluid, and the outside more. ” [chapter 10 Make:Soft Robotics ]
This weekend a few of us that were on the floor at the same time decided to join forces when we couldn’t find the right PVC size reserved from class (and after trying a local hardware store <3). Rachel, Madison, Gabriella & I went through the Bibenda pneumatic actuator tutorial round robin style, taking turns with each step / making sure we each understood & tried out all the tools. Matt was also in the area and reminded us how the Vacuum worked. Arnab who was in the room working on another project mentioned how he was excited to see the vacuum and that he had actually tried to make one himself one time. He mentioned that cellophane could be a good alternative as a material to help with future Silicone mold experiences.
Lessons Learned:
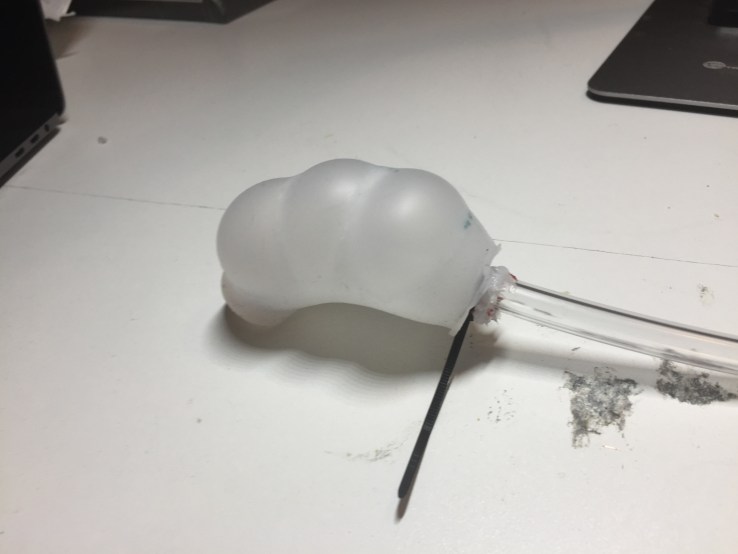
- make sure the core print legs sit super snuggly on the PVC pipe. This could mean for us adding more tape along the rim to increase pipe material thickness. We realized after the last degassing w/ the entire mold setup that the core had started to float a little out of the silicone, fortunately our actuator still worked for this round but would definitely fix for next time.
- When cutting the restraint slits in the tubing, we realized after applying silicone that our initial slit closest to the tip of the core was a little too close/large and wanted to slip off. Next time we would maybe start 18mm out from where we tied to increase stability.
- Making sure to be safe when cutting the styrene into 2×2 squares – When trying to snap after scoring it actually went through Rachel’s glove cutting her arm. Fortunately there’s first aid items in the shop! And also a reminder for all of us to keep on scoring if it doesn’t feel like a easy break ❤
- Apply PVC primer & cement in spray booth. I think we for some reason thought the degreaser was the item that needed the most ventilation so went straight for the pvc primer/cement in the room w/ windows open. In case you or others in the room have a more acute sense of smell / or are prone to headaches definitely apply in spray booth or w/ a window that can open more than NYC 4in standard 🙂
- This week Kari was super kind and provided a couple cores for us to use. If we were to print the core ourselves, we’ve realized its a good idea to go ahead and complete the Tandon Maker space training for their shop / 3d printers, due to it being thesis & many wanting to use the printers. It can be good to have 2 potential places to print to allow schedule / sign up flexibility


(pictures throughout process with Rachel, Madison & Gabriella – & a thank you to Matt for reminding us how to use the vacuum! We ended up using the remaining PVC from Matt & Ashley’s endeavors. We think either the class had already used the amount designated for the exercise, or maybe it had accidentally been placed into the junk shelf area after a previous group <3)


(Gabriella showing pix post removing from mold)

( learning how to use the Vacuum for the degassing stages)

(Madison pouring the A+B mixed Eco-Silicone mix into our mold from a distance to help with air bubbles)

(Rachel weighing & pouring the A+B mixture)
“This pneumatic bending actuator doesn’t have a specific job, but it’s a very good demonstration of how you can create a complex system with a minimal number of simple parts. It also serves as an on-ramp for working with cast silicone for robotics. The Bibenda can be cast in an afternoon, and its size and shape allow for bubbles to easily escape to the top for a clean casting. Another feature is the ease of demolding, which can serve as some early practice as you proceed to the more elaborate projects later in the book. This project can also be hooked up to the air power supply to be controlled digitally, or with a jumbo syringe filled with water to evoke the hydraulic motion of its namesake.
This design highlights the capabilities of using fabric to vary the amount of elasticity. By embedding fabric into the silicone to limit the stretch, we create zones of greater and lesser inflation. You can check out this concept as applied in RBO Hand’s PneuFlex actuators, where this kind of constrained area is referred to as the “passive layer” and includes embedded porous fabric. The PnueNet actuator developed by the Whitesides Research Group at Harvard takes advantage of what they call the “differential strain” effect to help achieve motions such as bending and twisting by using a paper layer to cause more rigidity. Similarly, a collaboration between UPenn and Cornell yielded an octopus-like skin by including fiber-mesh rings to make dynamic multidimensional motion.” – Chapter 10 Make:Soft Robotics
